Monday, June 30, 2008

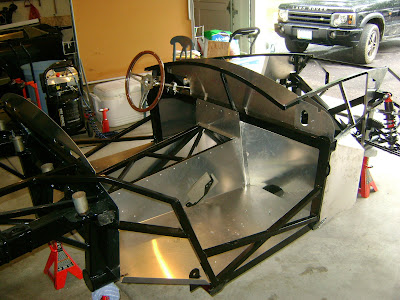
Day 10- Rolling chassis ( 70%)


Rear end is here!! IT finally came from ups freight, more about that later. Today we started out finishing up the front end buy attaching the flex lines to the calipers and then to the frame where they will eventually mate up with the hard lines. After a few practice bends on some spare brake line we ran our first line from the FRONT master cylinder to the driver side tee fitting ( Attaching to the flex line). So the line is tee'd off so we can continue across the frame to the passenger side flexline.


The rear end came in full force at 235 pm today after a long wait on backorder. Now the instructions for the rear end are worded as follows "Step 1: Put the bracket on the rear end", you can imagine how vague that is when you have literally boxes full of parts which are full of unnamed brackets. So after a " Clarification" call to factory five we worked it out, attached the lower control arms to the axle and the frame, assembled the coil over assemblies and called it a day.

Friday, June 27, 2008

Day 9 - Molecular Structure


On today's agenda was installing the front hubs, calipers, and rotors. On the first line item, Hubs, we had issues with sliding them on the spindles . The first couple times the hub would slide on maybe a millimeter and instantly bind up and then we would have to use a hammer to get it back off. We decided there had to be a smarter way of doing this, so after some thinking ( and calls to facotry five) We wrapped the spindles in ice packs and heated the hub with a torch unitl it was black. Then they slid on smooth as glass. It was truly an awesome example of scientific fact. Cold : Contracts, Hot: Expands. After our trip back to chemistry class the rotors and calipers went on without problems. Will post a pic tomm! Rear end comes in monday!

Wednesday, June 25, 2008

~Spy Shots~


While me and Steven are out doing the college orientation thing we received a few goodies. I'm not going to give details just yet, all I'm including is some cell phone spy/paparazzi pictures of our recent deliveries. Ill give you a hint: the two boxes contain parts that each require the other to function correctly and the huge box is on a pallet and was delivered freight is approx 450lbs, and is brandishing a silverish color. Begin the pondering (I know, I know its pretty obvious if you have a pulse of any kind...).

Friday, June 20, 2008

Well 0-60 should only take one shift...


Just relaxing today getting some housekeeping stuff done and was wondering what the top speed of our cobra would be based on the tire size, final drive ratio, transmission ratios and engine rev. I used a handy little online calculator and this is what it produced. If wind resistance and rolling resistance don't prevail, then, Damn.

Wednesday, June 18, 2008

Day 7 & 8- Aluminium (english accent)


So I didn't blog yesterday for number of reasons: No camera, No energy,No time, Not a lot changed.

When i say not a lot changed i don't mean we were lazy and didn't do anything but nothing really looks different from 10 feet. We were siliconing and riveting the 10 aluminum panels on the driver and passenger footbox , the rear cockpit wall, and the floorboards which were already being held temporarily in place by a couple sheet metal screws. So what was there temporarily is now there fastened for eternity by 1/8 inch rivets.

We've already blown through 5 1/8" drill bits drilling the hundreds of holes for the rivets which is why a buddy instructed us to pick up about 40 1/8" bits; we have 35 left.

Oh in case you were wondering if you hit a cicada on the garage floor with a deadblow hammer it ceases to exist.

Monday, June 16, 2008

Day 6- Progress!!


After a short hiatus we are back in full swing accomplishing the arduous task of installing the Wilwood racing pedal box and master cylinders today. Again, after a few calls to factory five and emails our issues were solved with the pedal box mounting plate and everything went in very smoothly. So now we have the brake pedal mounted and connected to both its in-cockpit master cylinders and the clutch quadrant assembly configered to operate the cable through the firewall. IT is a very solid set-up which is not suprising from the captial red letters on the box RACING USE ONLY which should hold up to some clutch mashing 1-2 upshifts and hard braking for those pesky stopsigns.


As of right now there are numerous parts on backorder including the whole rear end ( which was supposed to be done before the pedals) that we are waiting on but for now we are trying to expediate thier arrival and attempt workarounds. Later.

Thursday, June 12, 2008

Day 5- Tough day at the office....

Tough, a good description of what today was like. There were issues with the outer tie rods and the steering wheel orientation when the wheels were straight. After a few calls to factory five tech support to figure out what was going on and speaking with an engineer then solutions came, slowly. Not including a pic today because, yeah, nothing visual changed but a few very important things were fixed and corrected so now the rest of the build can go smoothly. Sometimes you have to sacrifice a workday to fix the little stuff to enable you to tackle the bigger, more satisfying things.

I dislike this quoteForgivness is The ultimate sacrifice.
Eloquence belongs, To the conqueror.
-Serj Tankian

Peace

Wednesday, June 11, 2008

Day 4- Just drive it home, ya know?


Put in a long day today, 9-5 like were almost working at a real job...... not. This stuff is way to fun to classify as work. We started off today continuing on the front suspension, adding the lower control arms, assembling the Koni red coil over shock set-up and installing it on the car. Front Suspension: DONE.


Next was the steering rack and pinon and after stumbling through a couple oddly worded instructions it was in along with the beautiful wooden steering wheel and the steering shafts. Then, the inner tie rods were topped off with the outer tie rods, linking them to the spindle. Hey, its starting to resemble a car. And no we did not put the steering wheel on prematurely to have some kind of instant gratification it was actually a step. Trust me.

Tuesday, June 10, 2008

Day 3- How the hell does a rivet work?


Today was very eventful.
All the aluminum panels that were temporarily on the frame were traced with black sharpies to outline where they touch the frame. Next they were taken off and drilled for rivets.

Then the actual chassis build up began ( the part where we actually get to put stuff on the car). The first step was to rivet the engine bay aluminum in place. As neither of us had riveted or used a pneumatic rivet gun or even fully understood the concept on how rivets work, it was definitely a shot in dark as the first one popped in successfully with a *cling*. We were shooting them in like pros by the end of the 40+ we did ( IDK what we'll be by the time 700 comes around). We made another run to home depot and got the silicone sealant first and applied it where the panels touch the aluminum.


After the firewall and side pieces were riveted in we started installing the front suspension. Starting with the upper A arms and lower control arms.


Also in case you were clueless on what the body buck is here is the body as it sits now awaiting its turn.


Monday, June 9, 2008

Day 2 - "Beefy"

First a little background on the title, As our wonderful truck driver ( as seen in yesterdays blog) unloaded the boxes from the semi and would hand us them, if they qualified as heavy in his mind, then he would announce the description "beefy" as the transaction took place. Coupled with his accent this became very comical after 8 or 9 times.

Today was filled with lots of driving all over town collecting needed supplies such as an Shiny new air riveter from Granger Industrial Supply and a 4 x 8 sheet of particle board for the body buck. We assembled the body buck ( A temporary wooden structure used to place the body on) from two 4x4's and that particle board mentioned earlier. Then the body was unbolted from the frame and placed onto the buck for storage. Sounds like small tasks but trust us it was a lot of work and thankfully, visual progress. The frame now sits naked ready for assembly.

Sunday, June 8, 2008

Day 1- Arrival of Kit and unpacking


Yeah It's Here...

Hey,
This will be the first blog post of many. I am beginning this blog on the day of the arrival of the kit and updating it weekly with our progress with text and pictures. Enjoy our build up of a Factory Five Racing Cobra kit car!!!
- Andrew

Day 1 - Arrival of kit and moving boxes and body/frame assembly ( a mere 550lbs) from transport truck.


Our cobra tucked away in the truck awaiting its new home ...... and our very friendly truck driver


Fresh off the truck


Into its new home for the next few months


"Beautiful people build beautiful cars"- anonymous
( Dave, Steven, Andrew, Rick)


We like to call it "Creative Extermination"
(Bottle rocket+unlucky cicada+superglue+ignition)

All for now, first day of work starts tomorrow.